Tuesday, April 25, 2023

U is for Undercoat, UV Resin

Undercoating is really just another way of saying "priming," which we discussed in depth last week. It's probably better to use the term priming anyway, as "undercoating" can be confused with "basecoating."

We also discussed UV resin last week, in terms of 3D printing. But UV resin also has other uses.

In printing, UV resin is deposited in thin layers and then cured with ultraviolet light to harden it into models. You can actually achieve similar effects by pouring the resin into a mold and then hitting with a UV light.

In modeling, UV resin is often used to make glass or water effects (materials that have a translucent appearance). 

Some custom bases that use resin to create awesome water effects.

You can also use silicone to create a mold, often by pressing it against a piece or texture you want to copy, and then fill the mold with resin to make a copy of the original piece. I've seen it used by people customized their miniatures, to create new shields, armour, or elementals to add to the base (like skulls, rocks, etc.)

It says "water effect" but what they're actually doing here is using a mold to create a small beetle-like creature, which could be easily added to a miniature or base.

Just a short post today, tomorrow should be more interesrting and involved. The end is in sight!

Hugs & Kisses,
-CDGK

Monday, April 24, 2023

T is for Terrain

Terrain is the area where you play your tabletop game, representing the environment where the characters are located. In a wargame like Warhammer, this could be a large battlefield, in Dungeons & Dragons this could be an elaborate dungeon or castle. Really anything is a possibility.

Some people use simple grid maps with 1-inch squares, providing a quick simple reference for scale. Obstacles and points of interest can just be written in with a pencil or erasable marker. This is certainly the cheapest and easier method.

This is a pretty nice battle map, honestly. I've seen stuff with just graph paper and crayons.

When simple maps are cutting it for you, you can start adding rocks, trees, doors, whatever works. Some people go for realistic, detailed pieces that would fit in a high-quality dollhouse. Currently, I’ve been making terrain out of 2-foot diameter discs, and then using interchangeable scatter terrain to customize the scene as needed. My zombie parking lot was made using this technique:

And here’s a forest I’m working on:


Next will be some dungeons/caves, for classic underground exploring. The nice thing about this option is that it’s customizable, and I can focus on the elements that are most important to the scene. I don’t need to put in every wall or crack, but there’s enough pieces to add interest and interactivity. Plus I can just move them around for the next battle/scene/game. And as an added bonus, I put the disc on a lazy-susan-style turntable so I can rotate it and every person at the table can see every angle.

Of course, some people go ALL IN, and build stuff like this.

Source: Imgur


I have neither the time to build this nor the space to house it, but I absolutely salute and envy the folks who have the skill and patience for this kind of craft.

Hugs & kisses,
-CDGK

Saturday, April 22, 2023

S is for... Several Things

There are quite a few terms relating to models and minis that start with "S," so let's just quick go through a list:

Stippling is a technique where you apply tiny dots of colour using a very fine brush. Varying the density and colour of the dots can produce a shading/highlighting effect, much like screen tones are used for shading in comic books.

Shading - we've covered this a few times, but shading basically means adding dark shadows/lowlights to create contrast. There are a few ways to do this: you can paint on shades darker than your basecoat; you can use a dark wash to fill in the recesses; or you can use a dark base coat and then drybrush or highlight with a brighter colour. I'm sure there are others as well, but these are the most common.

Scatter terrain is obstacles and decorative pieces that are "scattered" across the terrain or battle map for your tabletop game (you didn't think we just used tiny people by themselves, did you?). Common scatter terrain includes trees, rocks, and barricades for outdoors settings, or tables, chairs and barrels for indoors. They help set the scene as well as create interesting changes to the environment for the players to interact with or overcome.

Source: Me

Sprue is the plastic frame on which model pieces come attached. Often the first step to modeling, before the paint and gluing, is cutting these bits off the sprue. Many enterprising modelers will actually save their sprue scraps to make other models (especially handy for railings, pipes, antenna, etc).


Whew, made it through another week! Can I get through one more?

Hugs & Kisses,
-CDGK


Friday, April 21, 2023

R is for Resin Printing

In chemistry terms, a resin is a solid or highly viscous substance of plant or synthetic origin that is typically convertible into polymers (a polymer is a synthetic material like nylon, polyethylene, polyester, Teflon, and epoxy).

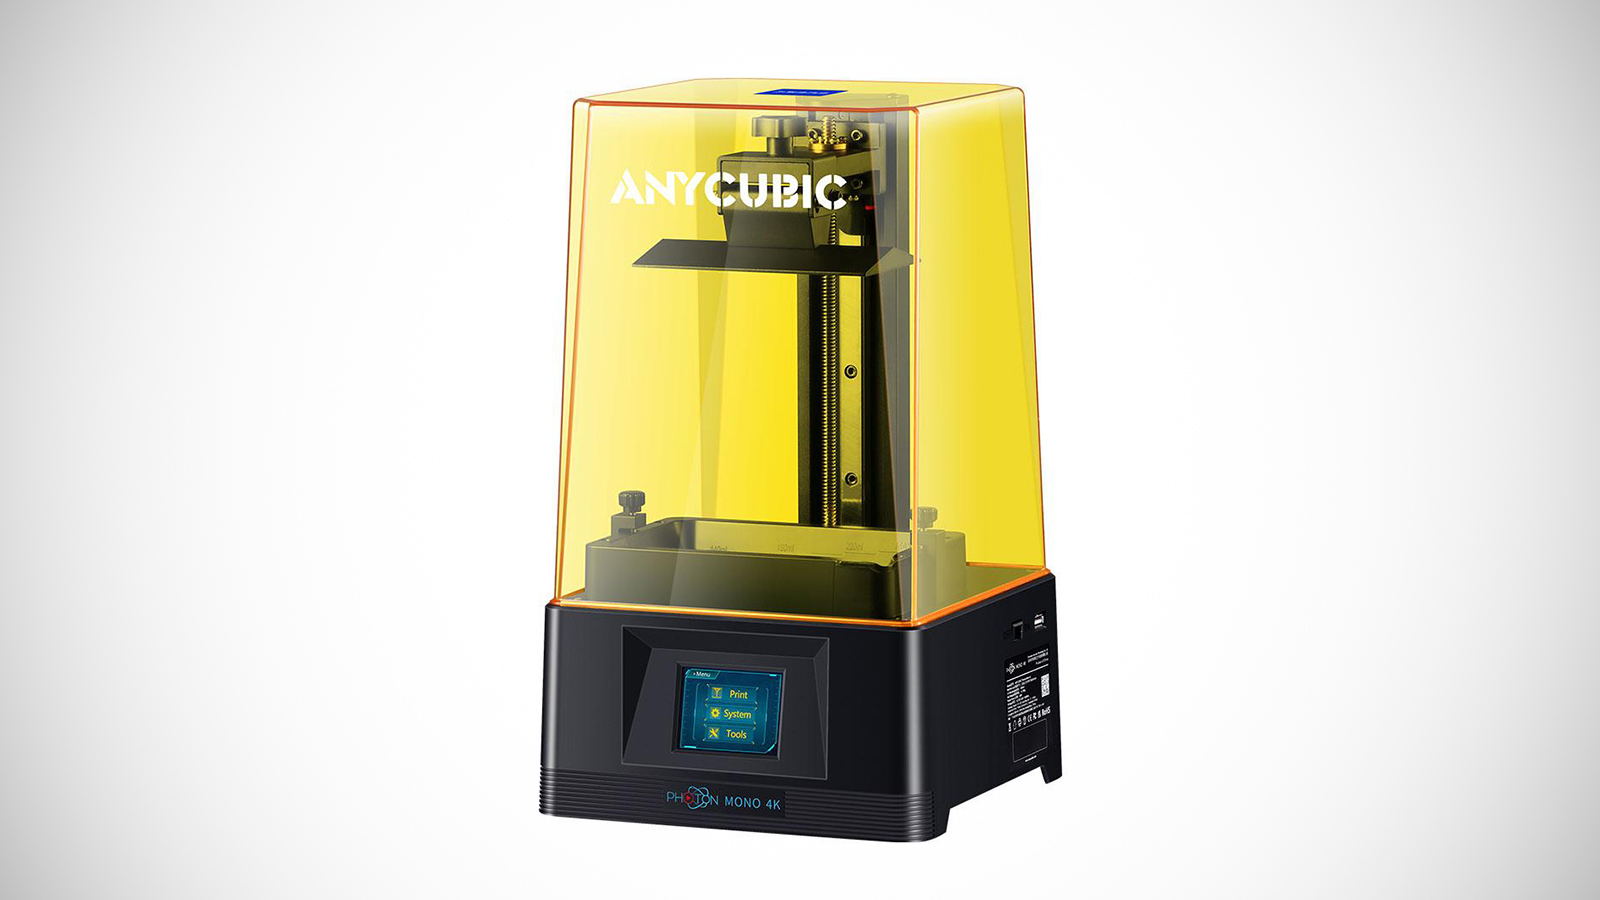
In terms relating to miniature and model painting, resin printing is a type of 3D printing used to create highly-detailed models, exactly the kind that can be used for said painting. The process beams ultraviolet (UV) light into a tank of liquid resin, triggering a reaction that solidifies the resin into a hard plastic. The individual layers of printing can be as thin as 0.02mm, so you get some VERY precise details with this type of printer. Dentists even use them for creating crowns and false teeth!

This is my baby, the Anycubic Photon Mono 4K. I haven't used it print any teeth. Yet.
Source: Anycubic

The great thing about 3D printing is creating your own models in whatever size and shape you desire. You can find or buy countless model files online, and if you have the talent and skills you can also create your own. It’s also very cost-effective. Good quality miniatures can easily run $5-$15 each (or more, for Warhammer minis), whereas the material of cost of said minis on a resin printer is often just pennies. 

(And yes, I acknowledge that the purchase and maintenance of the printer is not negligible, however in the long run it more than pays for itself).

This is what a print generally looks like when it comes off the printer. The scaffold-like supports surrounding it are to support thin, protruding pieces of the model during the printing process.

A couple of things to be aware of: UV printer resin is not as flexible as most other types of plastic. It can be brittle, so dropping it, especially tiny people with itty-bitty arms and sword and stuff, can be VERY catastrophic. You can mitigate this by using certain types of tough (and slightly more expensive) resin, which I’ve since switched to, because it’s just too heartbreaking to drop an entire tray of a dozen or more printed, cleaned, prepped and primed minis (representing hours and hours of work) to have them shatter in hundreds of pieces.


Not everything I print and paint are tiny gaming miniatures. These larger models were for my nieces, based on characters and items from their favourite TV shows. That box was one of the hardest/most annoying things I've ever printed, due to some of the weird problems with printing large solid objects with resin.

Another sticking point is that resin is toxic, and gives off potentially harmful fumes when printing. This resulted in me setting up a complicated series of heaters, fans and HEPA filters in my garage in order to run it, but again, it’s something you just have to plan and work with. I wouldn’t recommend running a resin printer in your bedroom with the doors and windows closed, but most people can get by with an open window and a simple fan. 

Anyway, despite the drawbacks, 3D printing is SUPER addictive and gives me a nearly unlimited supply of models to paint. I literally have close to a hundred waiting for me, and I’m still constantly finding more stuff I want to print. If you’re into model painting, I can’t recommend it enough. Or at the very least, find a friend who has a printer. Otherwise you’re going to end up buying prints on Etsy, which, lemme tell you from experience, ends up being WAY more expensive in the long run than buying your own.

This is from a few months ago. I've added WAY more models since then, and the shelf underneath this one has twice as many, still waiting for paint.

Hugs & Kisses,
-CDGK

Thursday, April 20, 2023

Q is for Quality

A lot has been written about the “Quality” level of miniatures. Warhammer even has semi-official rules about what quality of painted miniatures are allowed at official Games Workshop events, though their definition of what constitutes an acceptable level of painting is annoyingly vague.

Basically, miniatures can be graded as to whether their paint jobs meet certain standards. Exactly what those quality standards are, and how they are met, is up for endless debate. In reality, a painted mini is good enough as long as you (the painter or owner) is happy with it. That said, people love to grade things, so we have these loose categories of quality levels.

Tabletop Standard

Basically, these minis are “good enough.” That doesn’t mean bad per se; they look presentable and pleasing to the eye on a game table.

  • Each major element on a model is defined by appropriate colour (example flesh/skin versus armor/cloth)
  • A wash or ink adds shadow, a dry brush or simple highlight technique adds a highlight (say it with me: contrast!)
  • Bases are finished with paint or flocking material, such as sand or grass
  • No primer or bare metal/plastic shows anywhere on the model
  • The model is clearly identifiable and looks “good” alone or in a group of similar models from “playing distance” (about 3 feet away)

All of my miniatures would fall into this category at best. The funny thing is that most pre-painted minis sold by major lines (like Wizards of the Coast for Dungeons & Dragons) do NOT meet these criteria.

Seriously - no highlights or shadows, unfinished bases, fine details are muddy. And they sell these for $30-$50 for a pack of five!

Display Standard

The criteria for this one is a bit fuzzier. There are pretty set guidelines as to what makes something “tabletop-ready,” but now we’re getting into stuff that’s “gee-whiz-cool.” Which basically falls into anything that’s slightly better than tabletop standard.

  • We still need appropriate colour for each major element on the model
  • It may contain added free-hand details, wet-slide decals, or other texture elements
  • Contrast is well-done, not necessarily smooth, but closer to realistic lighting appears on elements of the miniature (colour blending)
  • Bases are definitely finished with paint and/or flocking material
  • The model looks good in isolation and stands up to closer scrutiny when held between 1-3 feet away

That last one is the big difference for me. Tabletop standard looks good in a group of minis on a table. A “display” mini can be scrutinized more closely and still stands up.

Collector Standard

This is top-of-the-line, super impressive quality. This is where your NMM and OSL comes in, where you’re doing fancy glazes and layers, and you’re producing a model that someone would pay top dollar for, and then put it on their shelf in a protective case.

You can't find a better example of Collector Quality than Sergio Calvo.

  • Colour, light, and texture are well defined in each element of the model
  • Fine details, like belt buckles, facial features, and hair texture, are visible with close inspection. 
  • Light and environmental context provide more information for the viewer. In other words, the artist has added intrinsic or extrinsic environmental elements and successfully added these details to the painting - a perfect example of this of course being Object-Source-Lighting
  • Narrative elements stand out, such as a custom base or other elements that add to the context of the miniature - does the model tell a story?
  • The painted miniature is photogenic, and stands up to the scrutiny of high-resolution photography. Photography tends to reveal even the smallest painting errors and flaws.

These are the kinds of models that get entered into painting competitions, and that I’m a long-way off from executing.

Personally, I have another, slightly different Quality Level range that I like to use. It comes from a comic strip called Knights of the Dinner Table, about a group of friends playing a Dungeons & Dragons-style roleplaying game around their dining room table. One of the characters, Bryan, a hardcore nerd and gamer, paints miniatures as a side business. He has three levels of quality he produces, each with a progressively steeper price tag.


Bryan's Miniature Painting Levels:
  • Slop & Go 
  • Tabletop
  • Museum Quality

Those should be all pretty obvious based on what you now know about mini painting. Personally, I think most of my stuff falls between the Slop & Go and Tabletop categories. “Museum Quality” is a goal I can strive for in the future.  

Anyway, I'm off to do some Slop & Go's before bed!

Hugs & Kisses,
-CDGK

Wednesday, April 19, 2023

P is for Primer

Priming is the first step of painting, so it’s only appropriate that we’re finally talking about it on, what is this, day nineteen? Oh well, better late than never.

Primer, also called the undercoat, is the first layer of paint applied to your model. It’s used as a matte, non-reflective surface with “teeth” that makes it easier for your further layers to adhere. When I first started painting years ago, I couldn't figure out why my paint wouldn't stick. I didn't know I needed primer (and I was painting metal minis, which was even worse).

I didn't have a friggin' clue what I was doing.

Primer is usually a flat, neutral colour - black or dark grey is often recommended for beginners, because it hides imperfections. Or at least makes your missed spots look like shadows. There are plenty of reasons to use other colour primers, too. With contrast paints, like The Army Painter's Speedpaint, you really want to use a white primer to make the most of the built-in shadows and highlights. For my zombies that I've shown a few times, I used a yellowish Bone White primer to give a more sickly base and overall grungier look to my undead figures.

Bone White primer with a light wash of light brown to bring out the details.

Added some blocking with contrast paints.

Spattered on some red Speedpaint in key areas.

Added a glossy varnish to make that blood look fresh and visceral.

A popular technique for priming when using Speedpaint is called "Slapchop," which involves putting down a black primer, then a coating of lighter grey primer, topped off with a drybrush of white on just the highest points. This helps enhance the effectiveness of your contrast paints, to make the highlights brighter and the lowlights darker.

Kinda like this. I found with this one, the final product was a bit too dark. That's why I now tend to use a light primer with a dark wash instead. If I did this technique again, I would use a lighter grey and a lot more dry brushing.

Primer can be applied in numerous ways. A spray rattle can is a popular choice, and brands such as Vallejo and The Army Painter make a variety of colours. You can also use the spray cans you buy at the hardware store, but the quality varies tremendously. I love the Rustoleum Grey primer, but I can't find a decent white primer to save my life (white, in general, is a tough colour to get in a consistent quality, in any kind of paint).

Those who use an airbrush swear by its use for priming, which makes perfect sense. It combines the smooth, even coats of aerosol paints but without the harsh smells and mess of rattle cans. In a pinch, you can also use brush-on primer. It may not be as smooth as aerosol paints, but for those who don't have an airbrush and either can't or don't want to use rattle cans, brush-on primer is a godsend. 

Some very smooth, nicely-primed Warhammer miniatures.
Source: Wargamer.com

I used a lot of brush-on primer during the winter because the weather was too wet and cold for spray paint - I don't have a fume hood so I have do do my spray-painting outside. This brings us to a final important part of priming - the right conditions. To get your best primer coat, you want your model to be as clean as possible, which will involve clipping and sanding rough areas, then giving it a good wash with soap and water, and then letting it completely dry. If you're doing any kind of spray primer, you also need the right atmospheric conditions - not too hot, not too cold, not too humid, not too dry. Spray painting outdoors in the winter often leaves you with lumpy, runny primer, which will totally ruin your paint job even before you start.

White spray primer is a bitch.
Source: Reddit

It's nice talking about a topic I actually know something about. It makes me feel like I'm not a total poser. I do know my stuff sometimes!

Hugs & Kisses,
-CDGK


Tuesday, April 18, 2023

O is for OSL

Object-Source-Lighting or OSL is a mini-painting feature where the actual source of the light is depicted on your model or its base, such as a torch, lamp or glowing sword. Basically, the model is painted to look like the light is being projected onto the rest of the mini.

This was the first OSL mini I saw, and it totally changed my view of what could be done with a miniature. The subtleties with the lighting are just amazing.

OSL is one of my favourite mini-painting techniques. I think it just looks so damn cool, and brings so much life and realism to a piece. It really makes it seem like it’s capturing a moment in time. I’ve tried it myself, but the results weren’t particularly great.

I've got to try this again. I showed this one to me kids and they asked "Why is it all dirty? You got yellow paint everywhere."

An interesting tidbit about OSL is that we can pinpoint exactly who brought it to miniature painting. In 2001, Victoria Lamb became the first female hobbyist in the world to win the Slayer Sword (an award given at the annual Golden Demon event for the top model of the entire show - Golden Demon is for the best miniature painters in the world), and she did it with the first known model in wargaming hobby to feature object source lighting:

The Rescue of Sister Joan, by Victoria Lamb. This thing is only like 6 inches tall, so it's pretty amazing anyway. When you realize it was the first time many had seen OSL, it must have been mind-blowing.

Victoria herself is an interesting and inspiring figure. She started painting Warhammer back in the mid-eighties, and now has her own line of miniatures (check them out https://victoriaminiatures.com/)


 Tomorrow I'm back to a basic technique, so I should have some better examples of my own work.

Hugs & Kisses,
-CDGK

Related Posts Plugin for WordPress, Blogger...